Documentation
LoopMonster Documentation
A 5-track hardware-style looper for Ableton Live. Record, layer, and perform live loops — all inside your DAW.
Quick Start
Get LoopMonster running and record your first loop in 5 minutes.
Installation
- 1Download
LoopMonster.amxdfrom your account or the product page. - 2Drag it onto any audio track in Ableton Live. The device loads with all five slots in the EMPTY state.
- 3Done — all dependencies are bundled inside the frozen .amxd file.
Record Your First Loop
- 1Set QUANTIZE to 1 BAR in the master section. Your loops will snap to bar boundaries.
- 2Press the Action button on Slot 01. LED turns amber (ARMED) — waiting for the next bar downbeat.
- 3On the downbeat, recording starts automatically. LED turns red (REC). Play your part.
- 4Press Action again. Recording stops at the next bar boundary and playback begins. LED turns green (PLAY).
Overdub
Press Action on a slot that is already in PLAY to enter overdub mode (LCD shows ODUB). Your new recording layers on top of the existing loop. Press Action again to return to PLAY. If the overdub went wrong, press UNDO in the master section to remove the last layer.
Controls Reference
Every button, knob, and display on LoopMonster.
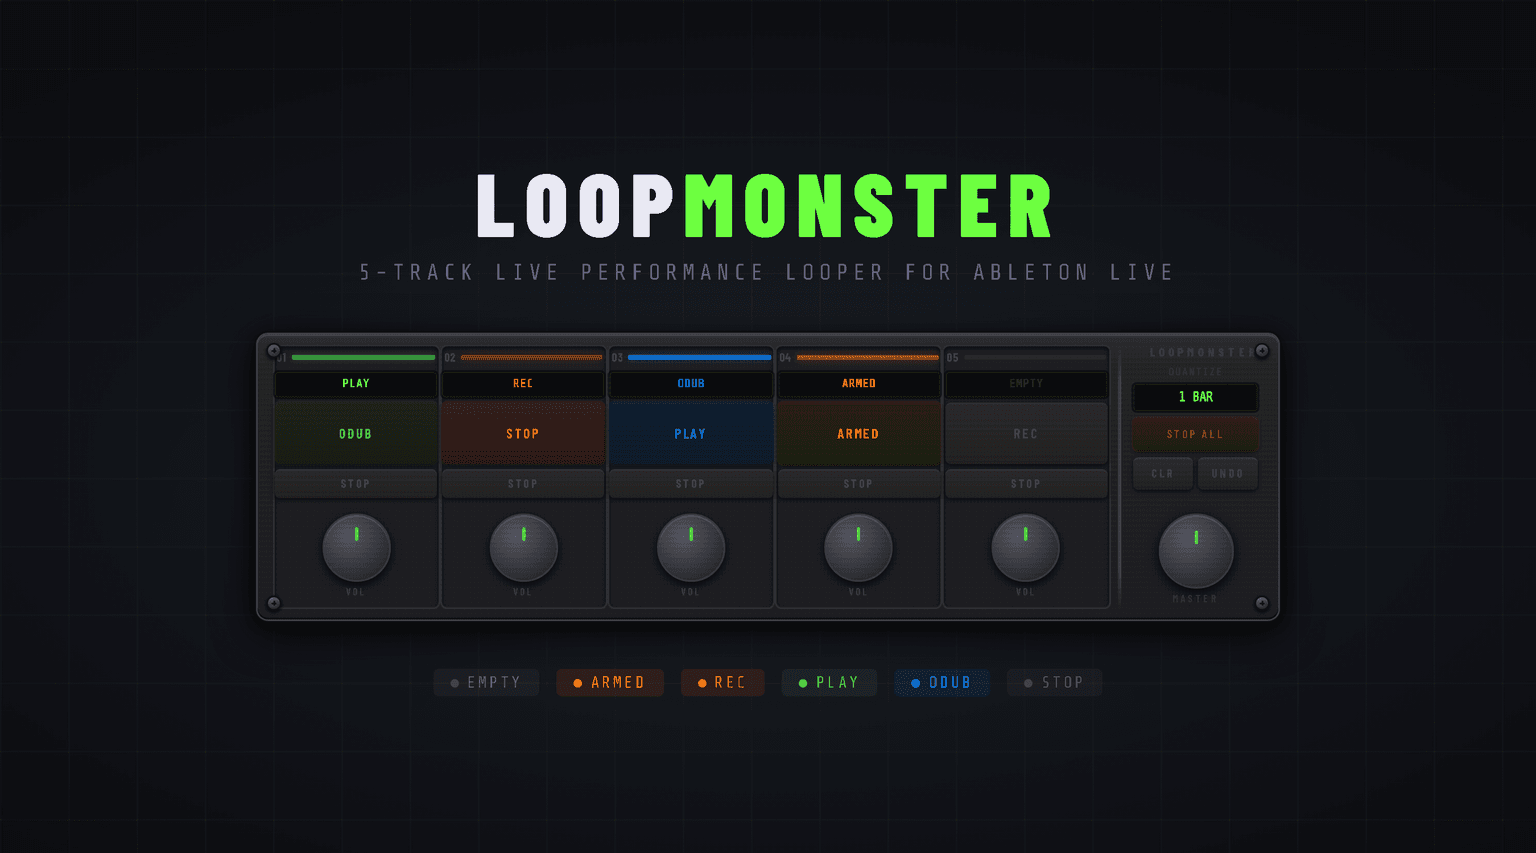
Track Slots (x5)
| Control | Function | Notes |
|---|---|---|
| LED Strip | Shows slot state via color | Amber=Armed, Red=Recording, Green=Playing, Blue=Overdub, Grey=Stopped, Dark=Empty |
| LCD Display | Text readout of state | EMPTY / ARMED / REC / PLAY / ODUB / STOP |
| Action Button | Context-sensitive main control | Cycles: Empty → Arm → Record → Play → Overdub → Play |
| STOP | Stop this slot | Slot stays in memory. Press Action to replay. |
| VOL knob | Per-slot output volume | 0 (silent) to full (unity). MIDI-mappable. |
Slot State Machine
Any state → press STOP → STOPPED → press Action → PLAYING
Master Section
| Control | Function | Notes |
|---|---|---|
| QUANTIZE | Recording sync grid | Off / 1 BAR / 2 BAR / 4 BAR. Set before arming. |
| STOP ALL | Stops all 5 slots | Great for breakdowns and drops. |
| CLR | Clear all slot buffers | DESTRUCTIVE — all audio deleted. Cannot be undone. |
| UNDO | Remove last overdub layer | 1 level deep only. |
| MASTER | Global output volume | MIDI-mappable. |
MIDI Mapping
Press Cmd+M (Mac) or Ctrl+M (Win) in Ableton to enter MIDI Map mode. All VOL knobs, the MASTER knob, QUANTIZE dropdown, and Action/Stop buttons can be mapped to hardware controllers.
Performance Workflows
Real-world techniques for live performance and studio sessions.
Building a loop from scratch
Beginner- 1. Set QUANTIZE to 1 BAR before you start.
- 2. Press Action on Slot 01 to arm it. LED goes amber.
- 3. Play your first element. Recording starts on the next bar.
- 4. Press Action again at the loop end point. Playback begins.
- 5. While Slot 01 plays, arm Slot 02 and record the next layer.
- 6. Repeat for up to 5 layers. Use VOL knobs to balance the mix.
The breakdown drop
PerformanceUse STOP ALL before a breakdown. All 5 slots stop simultaneously. When ready to bring everything back, press Action on each slot — they retrigger in order. For a clean sync, arm all slots quickly before the next bar and they come back together.
Overdub layering
Studio- 1. Record your base loop on Slot 01.
- 2. Press Action while playing to enter OVERDUB. LED turns blue.
- 3. Play the new layer — it records on top of the existing loop.
- 4. Press Action to return to PLAY. Both layers loop together.
- 5. If overdub failed, press UNDO immediately to remove the last layer.
Free-form ambient loops
AmbientSet QUANTIZE to OFF. Loops record exactly as long as you hold them — no grid snap. Great for drones, texture pads, and non-rhythmic material.
Quantize Guide
| Setting | Best For | Behavior |
|---|---|---|
| OFF | Ambient, free-form | Exact duration. No auto-start/stop. |
| 1 BAR | Tight rhythmic loops | Multiples of 1 bar. Most common setting. |
| 2 BAR | Chord progressions | Minimum 2-bar loops. |
| 4 BAR | Long phrases | 4-bar minimum for complex arrangements. |
Troubleshooting
Quick answers to common issues.
Setup & Installation
LoopMonster isn't loading / shows error in Live
The frozen .amxd bundles all dependencies. If it still fails to load, make sure you are running Ableton Live 12 with Max for Live 8.6 or later. Try deleting and re-dragging the .amxd from Live's browser to force a fresh load.
The device looks broken / missing graphics
This should not happen with the frozen .amxd as all assets are bundled inside. Try re-downloading the file and loading it again.
Should I put LoopMonster on an audio or MIDI track?
Audio track only. LoopMonster is an Audio Effect device. Drop it directly onto an audio track — it captures and plays back whatever audio passes through that track.
Recording & Playback
I pressed Action but nothing is happening
If QUANTIZE is set to 1/2/4 BAR, LoopMonster is waiting for the next bar downbeat. Make sure Ableton's transport is running (press Space). The LED should turn amber (ARMED) while it waits.
My loop is slightly out of time
Make sure QUANTIZE is set to 1 BAR (or higher) and Ableton's transport is running before you arm. Without quantize, loops start and stop exactly when you press — any human latency shifts the loop boundary.
UNDO didn't work / removed the wrong layer
UNDO is 1 layer deep. It removes the most recent overdub layer. If you overdubbed multiple times, UNDO only removes the last one.
All my loops disappeared
CLR was pressed (in the Master section). CLR erases all 5 slot buffers immediately and cannot be undone. Consider MIDI-mapping CLR to a button that requires a deliberate gesture.
MIDI Mapping
I can't MIDI map the VOL knobs
Enter MIDI Map mode (Cmd+M / Ctrl+M). Click directly on the VOL knob — a blue highlight should appear. All VOL knobs, MASTER knob, and QUANTIZE dropdown are MIDI-mappable.
Can I control LoopMonster with a footswitch?
Yes. In MIDI Map mode, click the Action or STOP button for any slot, then press a button/footswitch on your controller. STOP ALL is particularly useful on a footswitch for hands-free drops.
Audio & Performance
The device is using a lot of CPU
With all 5 slots active at high sample rates (96kHz), CPU usage increases. Try freezing unused tracks, or use 44.1/48kHz for loop-heavy sessions.
Loops are clicking / popping at the loop point
This usually means the loop boundary isn't aligned to the quantize grid. Make sure QUANTIZE is active so loop endpoints are bar-aligned.
Can I record stereo loops?
Yes. All 5 slots record stereo (left and right channels independently). The final output is also stereo via the internal matrix mixer.
Technical Specs
Device Type
Audio Effect
Stereo Tracks
5
Parameters
21
DSP Latency
0 samples
File Size
~206 KB (frozen)
Version
1.0.1
Requirements
- *Ableton Live 12 Suite (or any edition with Max for Live)
- *Max for Live 8.6 or later
- *macOS 11+ or Windows 10/11